[Werbung wegen Markennennung, unbeauftragt und selbstgekauft][English below]
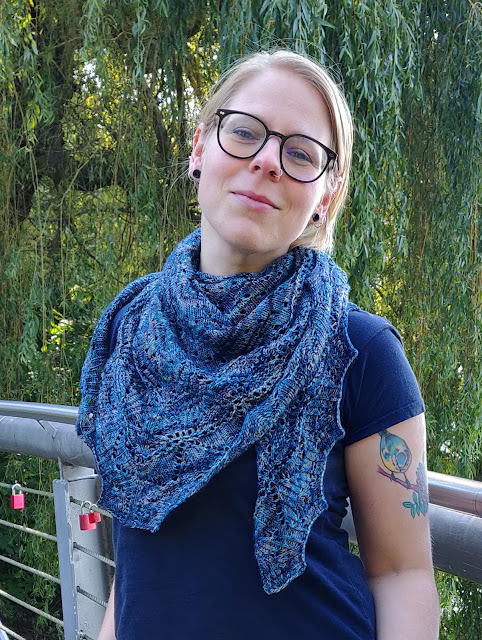
Ich liebe den Altweibersommer. Zwar hab ich's gerne warm, aber es geht nichts über diese frischen, kühlen Morgen und warmen Tage. Was ich am Altweibersommer auch liebe: Es ist die Zeit für große Tücher. Die kleinen Bandanas wandern so langsam in den Schrank und ihre großen kuscheligen Geschwister werden wieder ausgeführt. Eins meiner liebsten ist dieses hier.
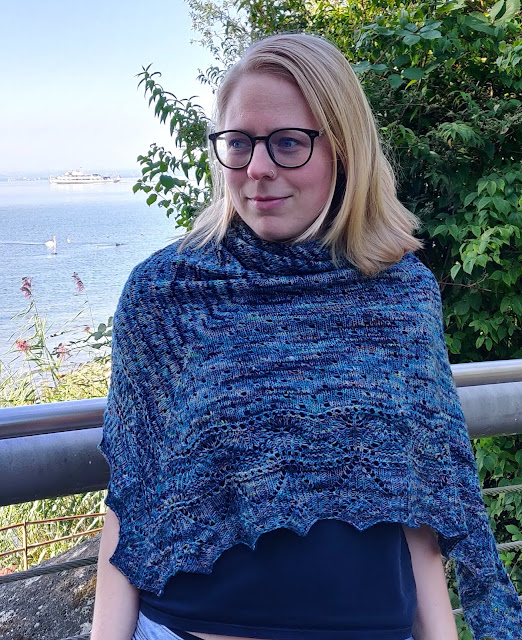
Was ich an großen Tüchern besonders mag ist, dass sie so ein All-in-one-Accessoire sind. Man kann sie schön um den Hals legen und sich einkuscheln. Oder man ersetzt die Jacke, indem man sie um die Schultern legt und sie dabei ihre ganze Schönheit zeigen dürfen. Wenn ich also unsicher bin, wie lange ich bleibe, oder ich damit rechne, dass es frisch wird, nehme ich gerne ein großes Tuch mit. Das passt zusammengelegt gut in die Tasche und ich muss keine Jacke unter den Arm klemmen.
Wick Lane
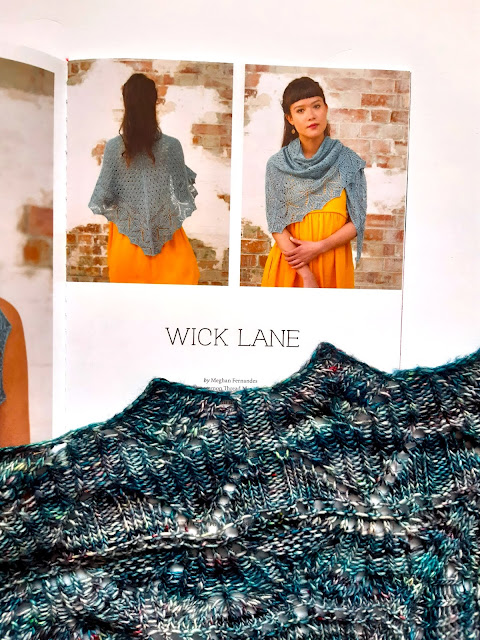
Das Pattern Wick Lane ist von Meghan Fernandes und ich hab's aus dem Pompom Magazine n° 1, ursprünglich erschienen im Sommer 2013 und dann zum 5-jährigen Jubiläum 2017 noch einmal aufgelegt. Ich hab mich sofort in die Borte verliebt, die irgendwie ganz klar und gleichzeitig ziemlich raffiniert ist.
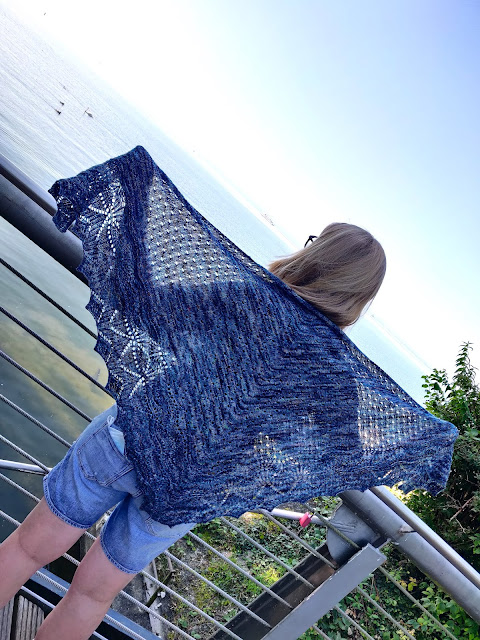
Raffiniert ist irgendwie auch die Konstruktion dieses Dreieckstuchs. Ich bin es gewohnt, Tücher "von innen nach außen" zu stricken, also an der oberen Kante in der Mitte zu beginnen und dann quasi entlang der Schenkel des Dreiecks zu stricken. Das ist so die klassische Konstruktion. Hier nicht.
Wick Lane wird von außen nach innen gestrickt. Man beginnt also mit einer Herausforderung: Gaaaaaaanz viele Maschen anschlagen. Die Anleitung gibt 2 Größen her und ich hab mich für die große Variante entschieden. Das hieß also, über 400 (!) Maschen anzuschlagen. Ich habe das tatsächlich im Kreuzanschlag gemacht und dabei natürlich nicht nur viel geflucht, sondern auch mindestens 3-mal angeschlagen. Rückblickend würde ich die Maschen aufstricken. Das gibt auch eine schöne Kante und die Gefahr, dass das Garn ausgeht, bevor alle Maschen auf der Nadel sind, besteht nicht. Die Technik ist super, ich mache das vor allem dann, wenn ich nicht so viel Garn habe und/oder viele Maschen anschlagen muss. Anleitungen und Videotutorials dazu findet man gut, zum Beispiel auf dem Blog von Ines Kollwitz.
Nach dem Anschlagen kommt dann auch direkt das Vergnügen: Die wunderschöne Kante strickt man nach Strickschrift. Ich finde es unglaublich anstrengend, so etwas nach ausgeschriebener Anleitung zu stricken. Das ewige Suchen im Text, wo ich denn jetzt war, macht mich wahnsinnig. Nach Strickschrift geht es super und ich finde, man kann viel besser sehen und verstehen, wie sich das Muster aufbaut. Entsprechend hat es mich auch gar nicht gestört, dass es nur Strickschriften gab (zumindest in der gedruckten Version, vielleicht ist das beim Ravelry-Download ja anders).
Die Kante ist die Kür, dann kommt die Pflicht: der Hauptteil mit einem gleichmäßigen Lochmuster. Dort, wo man bei der "klassischen" Konstruktion zunimmt, nämlich zu beiden Seiten der Mitte und an den Außenkanten (die ja dann die obere Tuchkante werden), wird nun abgenommen. Das war wirklich Fleißarbeit, aber die wunderschöne handgefärbte Merino-Wolle von Dibadu hat mich motiviert. Ich hatte 2018 zwei Stränge davon auf dem Leipziger Wollefest gekauft. Die Farbe heißt "Regenfront" und hat einfach alles: dunkle und helle Blau- und Grautöne, dazwischen Rot und Grün eingestreut. Geht es noch schöner?!
Garn: Dibadu Funnies, 2 Stränge in der Farbe "Regenfront". 100 % Merinowolle.
Anleitung: Wick Lane von Meghan Fernandes, Pompom Mag Issue 1, Anniversary Edition (2017).
Ninja Style: Bei dem Garn und der Anleitung hab ich mich nicht getraut. Aber ich hab auch keine Maschenprobe gestrickt und einfach darauf vertraut, dass mein Garn reicht. Das war schon etwas gewagt, oder?
I just love the Indian Summer. I do like warm wheather, but there is nothing better than the cool, crisp mornings and warm days of September. What I also love about this: It is finally time for big shawls. My small bandanas slowly are put back into the drawers and their big and cosy siblings are out again. This is one of my favourites.
The thing I especially like about big shawls is that they're kind of an all-in-one accessorie. You can wear them snug around the neck like a scarf. Or you skip the jacket, wear them around the shoulders and show them off in all their beauty. So, when I'm unsute how long I'll stay or think that it might get cold, I just take a big shawl with me. Folded up, it fits into my bag easily, and I don't have to carry a jacket around.
Wick Lane
The pattern Wick Lane was designed by Meghan Fernandes, and I have it from Pompom Magazine n° 1, originally published in summer 2013, then republished for the 5th anniversary in 2017. I immediately fell in love with the border that somehow has a clean, but at the same time playful look.
The construction of the triangular shawl is quite unsual. I'm used to knit shawls "from the centre", beginning in the centre of the top border and then working along the legs of the triangle. This is the classic construction. This shawl is different.
Wick Lane is knitted bottom-up. So you start off with a little challenge: casting on maaaaaaaaany stitches. The pattern gives you two size option and I went for the bigger one. That meant casting on over 400 (!) stitches. I actually did that with a classic long-tail cast-on. Obviously there was a lot of counting and swearing involved and I started over at least 3 times. Looking back, I'd rather use a cable cast-on. It also makes for a nice cast-on border and there is no risk of running out of yarn before all stitches are on your needles. I love this technique especially when I don't have that much yarn and/or need to cast on a lot of stitches.
Right after the cast-on, the fun begins: The wonderful border is knitted following different charts. I personally find following writting instructions for this kind of work followivery tiring. It drives me crazy to always have to search again to find the place in the text where have "left off". Following a chart is easier and I think, it helps you understand the construction of the pattern. So of course, it didn't bother me that there are no written instructions (at least in the printed version, no idea how the Ravelry version is).
If the border is the fun part, duty follows: the main section with the even eyelet stitches. Where you increase in the "classic" construction, i.e. on both sides of the centre or spine, and at the beginning and end of the row (that then will for the top border), you decrease for this pattern. It really was quite a routine kind of work, but the gorgeous hand-dyed merino wool by Dibadu kept me motivated. I had bought 2 skeins in 2018 at the Leipziger Wollefest. The colour is called "Regenfront" (meaning something like "clouds carrying rain") and just has it all: light and dark blue anf grey tones, with some red and green in between. Could it be more beautiful?!
Yarn: Dibadu Funnies, 2 skeins of the colour "Regenfront". 100 % merino wool.
Pattern: Wick Lane by Meghan Fernandes, Pompom Mag Issue 1, Anniversary Edition (2017).
Ninja Style: With this yarn and this pattern, I didn't dare. But I didn't knit a sample either, and just hoped and believed that my yarn would be enough. That is a bit daring, isn't it?


Keine Kommentare:
Kommentar veröffentlichen